Your history. Your inbox.
7 uniquely curated newsletters to choose from.


You’ve dreamed about escaping the bustle of everyday life, imagining a time when you weren’t constantly battling with your kids over screen time, without long days at the office toiling under fluorescent lights, and free of traffic jams and taxes.
You yearn for the simple life, with plenty more time for friends and family. The days would be filled with hearty shared meals, time spent in nature, honest work, and a sense of community. Sounds like paradise, right?
Or would it be?
The truth is, the past is a tougher place than most of us realize — filled with intense manual labour at work and around the home, often-gruelling modes of transportation, illnesses that could easily turn fatal, limited creature comforts, and unreliable communication.
But, if you still insist that life was better in the past, here are some tips and tricks you’ll need to survive in early Canada.

It’s 1535, and you’re part of Jacques Cartier’s exploration crew arriving in what will eventually become Quebec. The weeks-long voyage across the Atlantic has been perilous. Now, to make matters worse, you feel exhausted, weak, and irritable. You bleed easily, and your joints ache. Some members of the crew are losing teeth from their rotting gums.
That’s right — you have scurvy, which we now know to be the result of a vitamin C deficiency.
Thankfully, the Haudenosaunee take pity on you and share their cure: spruce beer, which can be brewed during winter months when fresh produce — also a source of vitamin C — isn’t available. For a non-alcoholic drink, simply boil spruce twigs in water and then strain off the liquid. The alcoholic version has a few more steps.

It’s the 1850s in a Newfoundland outport. Although you’re no pirate, day after day you feel like you’ve struck gold with a scaly fortune of your own: seemingly endless stocks of cod like the catch you’re hauling home.
Thick, yellow-tinged Newfoundland cod is popular worldwide, and the industry employs thousands. Mechanical refrigeration doesn’t exist, so to preserve your fish you must cure your catch using a centuries-old salting method. “Making fish,” the process of drying and salting cod, is a seasonal business that involves the entire family.
Although there are many ways of curing fish, you and your family will be making lightly pickled cod. It is a complex and technical process but yields a high-quality product.

With 7 uniquely curated newsletters to choose from, we have something for everyone.
You feel feverish, you have the chills, and medication to treat your condition is still centuries away. You shiver in your drafty 1830s log cabin, knowing that your influenza, if left untreated, could be fatal.
So you turn to a Mi’kmaq neighbour, who fights the flu using knowledge passed down through generations. She recommends making a hot drink using yarrow (Achillea millefolium), which is a flowering plant that can also be used to stop blood flow, to treat insect bites, and to relieve toothaches.
When picking the plant, make sure you go with someone who is familiar with the local flora, since yarrow — with its small white flowers — looks very similar to poisonous hemlock. A tea made from yarrow will increase your body temperature to make you sweat, an effective treatment for the early stages of the flu. Pregnant women, however, should avoid ingesting yarrow.
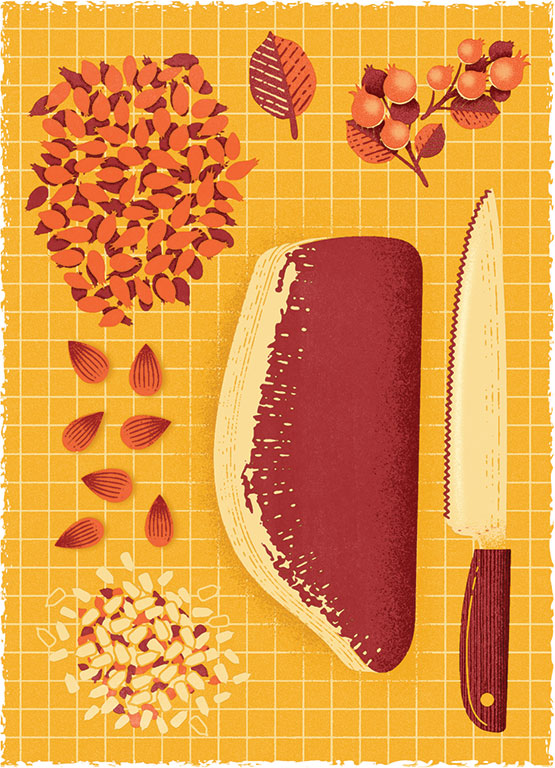
It’s the start of the fur-trading season. You and the other voyageurs are preparing for another long journey to the interior of the continent. At a Métis camp near the Red River Colony in what will someday be known as Manitoba, you line up to receive the bundles of pemmican that will keep you fed and fit during the arduous months ahead.
Nutritious and high in protein as well as calories (you’ll burn at least five thousand a day), pemmican is a traditional Métis food usually made of dried bison meat, bison fat, and berries, such as saskatoons, chokecherries, or blueberries.
The women who make the pemmican also sew bags made of bison hide to contain it. When stored properly, pemmican will keep for years without spoiling.
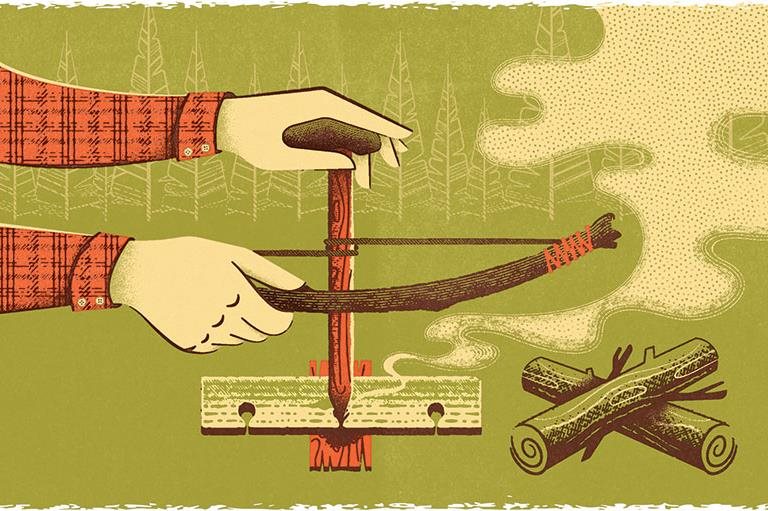
It’s the eleventh century, and back at Straumfjörðr — the Norse community in northwestern Newfoundland that will someday be known as L’Anse aux Meadows — the villagers are preparing for winter. Your assignment: Head inland and return with meat.
Although there’s not as much big game as back in Scandinavia, you should be able to catch some beaver, red fox, or Arctic hare. On occasion, you might come across the tracks of black bears or wolves. There are vast herds of caribou across the water in Markland, in what will eventually be called Labrador. But the moose that will be so prevalent on this island in the future will not be introduced until the 1870s. As night begins to fall, you prepare to make camp.
Alas! You’ve forgotten your flint back at Straumfjörðr. Looks like you’ll need to start your fire the old-fashioned way. With a sigh, you set to work building a bow drill.
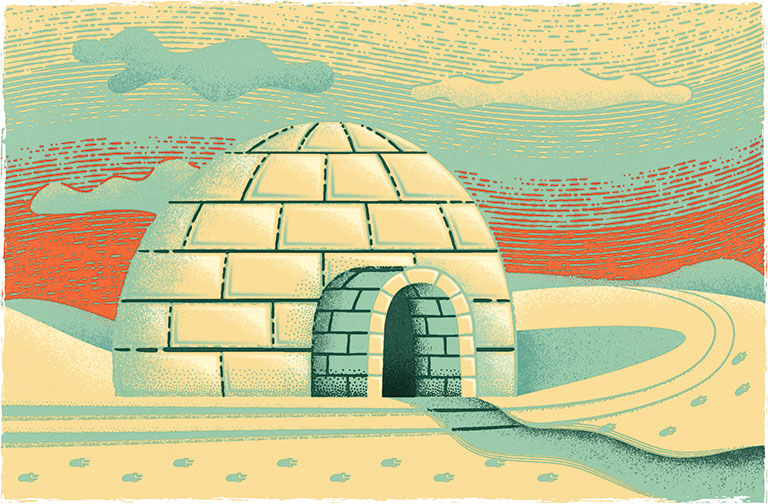
It’s 1847, and you’re part of a Hudson’s Bay Company exploration mission to the Melville Peninsula in the Canadian Arctic. Caught by a storm while away from your base camp, you need shelter fast. Fortunately, you’ve learned the art of igloo-making from Inuit you have encountered on your journey. They have built these architectural wonders for millennia.
The igloo’s parabolic shape provides support for the structure and prevents it from collapsing. The building material — snow — acts as an insulator, so any heat generated inside the dome mostly stays there.
The Inuit would dip their savgut, a probe made of a thin piece of bone, wood, or antler, in and out of the snow to determine its depth and quality. The snow should be solid but not too dense. They would then use their pana, a long-bladed snow knife, to cut blocks of snow.
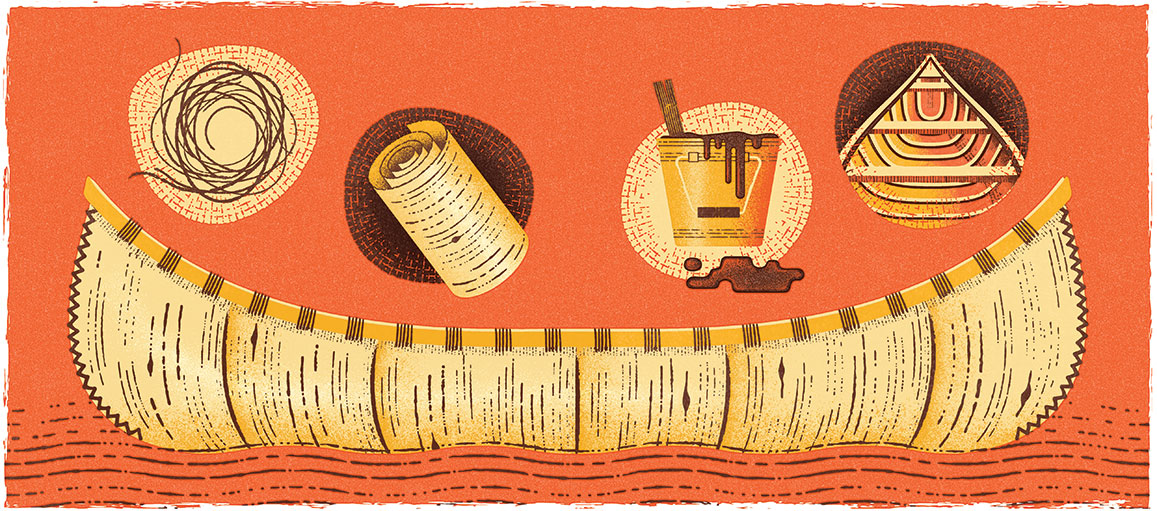
In the early 1700s, the forests of what will come to be known as Canada are vast and seemingly impenetrable, but you still need to move quickly as you carry hundreds of kilograms of goods and furs. For centuries, Indigenous peoples of the eastern woodlands have been building light and durable birchbark canoes that can help you navigate the water highways that lie ahead.
Begin collecting what you will need to build the canoe. This is the most difficult step, but the effort will pay off — if you find quality material, your canoe can last a century.
Harvest the bark around June, when the sap is flowing. Remove it carefully by peeling off only the outer layer, so the tree can still survive by growing new bark.
Construction will take about a week.

Are you a thrifty and creative housewife looking for new clothing and home textiles?
Why not make them yourself from empty flour or feed sacks!
In the tough economic times of the 1930s, when fabric is expensive and hard to come by, there is ample cotton available from bags containing flour, sugar, or animal feed. These sacks can be converted into many different items, from curtains and dish towels to clothing.
If you are lucky, you will find bags already printed with attractive patterns. But if the chicken feed comes only in plain beige bags, fear not — you can easily dye and decorate the cotton to your pleasing.
All you need for your dress are three bags and a pattern. You can even order the booklet Smart Sewing Suggestions from Maple Leaf Milling Co. for more inspiration.
Save as much as 40% off the cover price! 4 issues per year as low as $29.95. Available in print and digital. Tariff-exempt!
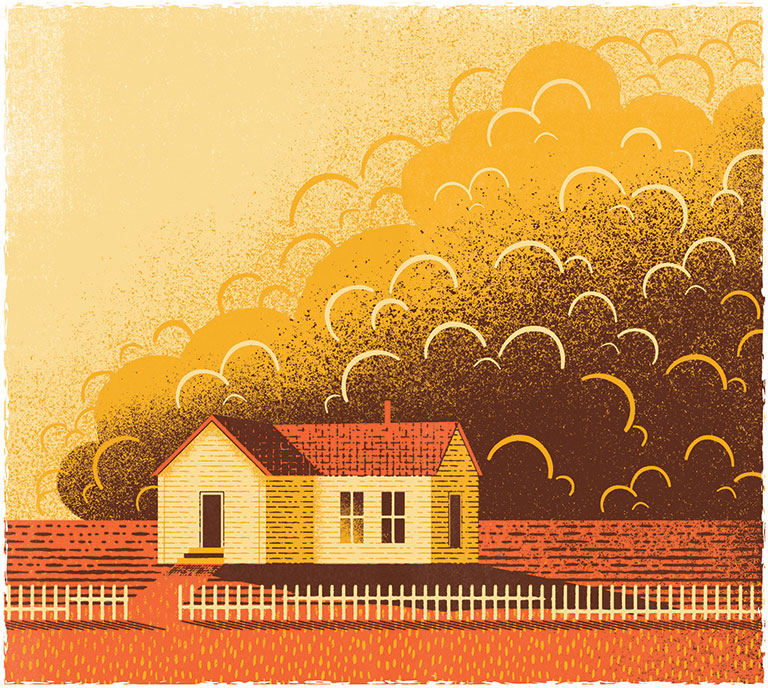
You see the cloud rising massively on the horizon, blackening the sky. You have only moments to spare before the dust storm reaches your home.
It’s the beginning of the dust bowl during the dirty thirties, a decade full of drought, scorching temperatures, crop disease, and insect plagues on the prairies. Though crop production is declining, farmers will continue to plant in hopes the worst has passed. The seemingly endless dry spell will eventually force thousands of climate refugees to flee the southern prairies.
The storm hits, and loose topsoil fiercely swirls about. You can barely see the ground at your feet, and you have difficulty breathing. Surviving these regularly occurring dust storms and adjusting to their presence has become a way of life.
The journey from York to your new homestead in the London District of Upper Canada was arduous, but now that you’ve arrived you know that it was worth it. You immediately set to building a log house. Without shelter, you and your family won’t last long out here in the wilderness.
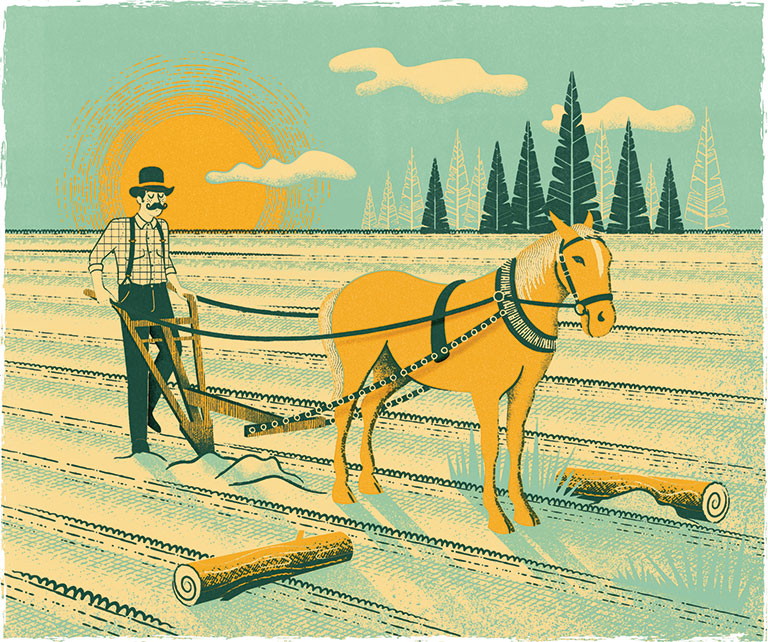
It’s back-breaking work building your home, but soon it’s finished — now it’s time to focus on your next task. You can already imagine the golden wheat and stooks of hay surrounding your newly built cabin — but that’s not what’s in front of you now at the beginning of the nineteenth century. Instead, your land is covered in rocks and trees.
You hope your property will eventually be bountiful enough to provide for your family, and even to yield extra crops that you can sell. You need to clear the land, a process that will span years; but even before it is completely clear you can sow crops between tree stumps.

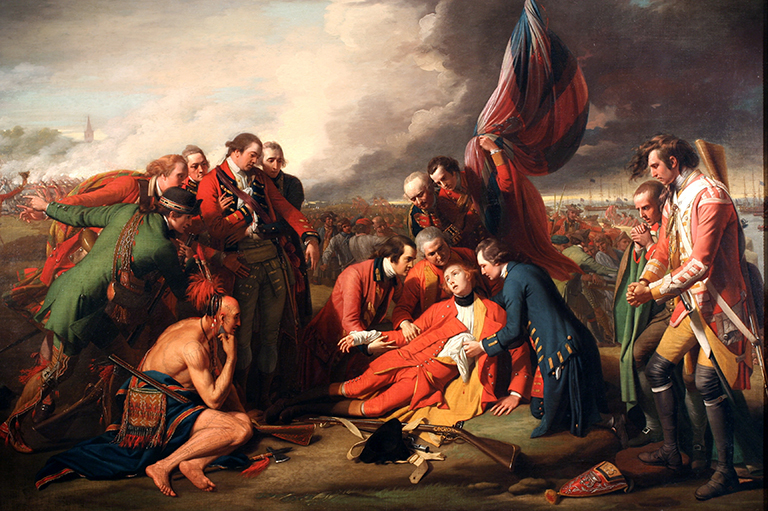
It’s September 1759, and you find yourself on the Plains of Abraham as part of a last-ditch British effort to capture the fortress of Quebec. In the distance, the French forces approach. The fate of the continent hangs in the balance.
Victory will go to the troops that can fire their muskets the fastest and, above all, can hold the line the longest. You and your fellow redcoats have spent untold hours drilling for this moment.
Editor’s Note: Enjoy “Old-School DIY” but remember that this is informational only, for your reading pleasure. Influenza, muskets, unknown plants — even igloos — can be hazardous to one’s health. These instructions are simplified and condensed.
The full feature appears in the February-March 2019 issue of Canada’s History. For more details about the steps outlined in “Old-School DIY,” visit the resources below.
We hope you’ll help us continue to share fascinating stories about Canada’s past by making a donation to Canada’s History Society today.
We highlight our nation’s diverse past by telling stories that illuminate the people, places, and events that unite us as Canadians, and by making those stories accessible to everyone through our free online content.
We are a registered charity that depends on contributions from readers like you to share inspiring and informative stories with students and citizens of all ages — award-winning stories written by Canada’s top historians, authors, journalists, and history enthusiasts.
Any amount helps, or better yet, start a monthly donation today. Your support makes all the difference. Thank you!
Advertisement
Canada’s History Archive, featuring The Beaver, is now available for your browsing and searching pleasure!